Understanding SAP Consumption Based Planning – MRP (Part II)

Boeing production line

Boeing production line

Planning Process

The planning process will normally take place at the plant level, but planning at the storage location level can be defined. The following processes are involved in consumption-based planning:

  • Firstly, the system will check if a material has been changed relevant to MRP and if it needs to be included in the planning run.
  • SAP calculates the net requirements for every material. If the net-requirement quantity is not covered, a procurement proposal is then created.
  • Lot-sizing calculation is then performed. Rounding up or down when this is necessary.
  • Scheduling is performed to determine the start and finish dates of the planned orders or requisitions.
  • Planned orders, purchase requisitions or schedule lines are created by SAP. A supplier can be assigned at this time also.
  • Critical situations are identified using exception messages. The planner has to process them manually.

A storage location can be excluded from planning and the stock not be included in the available stocks totals. We can do this at material level in material master (Tr. Code MM02) selecting the appropriate value for the MRP indicator for the storage location in MRP 4. But we can also exclude a storage location via the navigation path: IMG → Material Management → Consumption-Based Planning → Planning → Define Storage Location MRP per plant.

Planning run can be:

  • Total planning per plant
    • Online: Tr. Code MD01
    • Background job: Tr. Code MDBT
  • Single-Item, Single-Level planning → Tr. Code MD03)
  • Single-Item, Multi-Level → Tr. Code MD02 (take into account BOM)

The system creates procurement proposals which can be: Planned orders, purchase requisitions or schedule lines. A time fence and a planning horizon can be defined. Once a procurement proposal enter in the planning time fence, no automatic changes happen. On the other hand, the planning horizon is the period in which the materials which have undergone any changes are taken into MRP run.

Two methods are available to evaluate the planning results: the MRP List and the Stock/Requirements List.

  • MRP List → Tr. Code MD05
    This list contains the planning result information for the material and it is the initial working document for the MRP controller to work from. It is a static list and changes are not reflected on the list until the next planning run.

  • Stock/Requirements List → Tr. Code MD04
    This list shows the current stocks and requirements situation. It is a dynamic list since it is updated each time it is displayed, that is the reason because we can see an order which does not appear in the MRP List.

Lot Sizing Procedure

Lot sizing procedure gives the quantity to be procured or to be produced. This can be defined in the customizing path IMG → Material Management → Consumption-Based Planning → Planning → Lot-Size Calculation → Define Lot-Sizing Procedure. Three groups are available:

  • Static lot-sizing procedures
    The procurement quantity is calculated based on the specifications mentioned in the material master. The different procedures in this are:

    • Lot for lot
    • Fixed lot size
    • Fixed lot size with splitting & overlapping
    • Replenishment up to maximum stock level
  • Period lot-sizing procedures
    • In this, the system groups the requirements in the defined period and creates a lot. The periods can be defined in days, weeks, months, periods of flexible length equal to posting period,… Splitting and overlapping can also be done. The system sets the availability date to the first requirement date within the period, or the availability date can be set either at the beginning or at the end of the period.
  • Optimum lot-sizing procedures
    • In the previous procedures, the cost are not taken into consideration. Here the requirements are grouped together in a way which will reduce the cost.

Traffic Lights

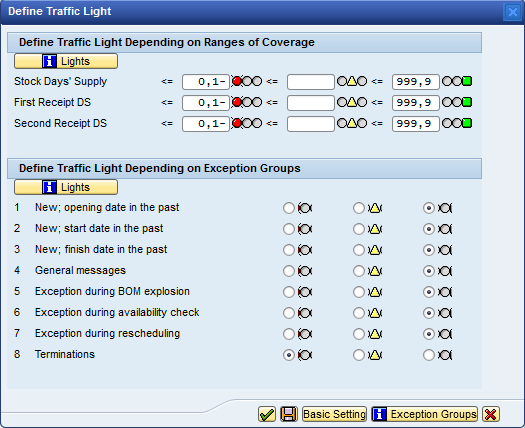
Traffic lights indicate the urgency of the materials to be processed. Traffic lights can be defined based on the ranges of coverage and exception groups which can be customized based on the priority. To define the traffic light, go to MD04, then push the overview tree button at top left corner, it will show the traffic lights against the material. We can also see the traffic lights of several material in the MRP List collective access → MD06 (static) and Stock/Requirements List collective access → MD07 (dynamic):

In MD04, right clicking the traffic light will pop up the dialog screen where-in the ranges of coverage and exception group can be defined.

Understanding SAP Consumption Based Planning – MRP (Part I)

Amazon's warehouse

Amazon's warehouse

Companies face the problem that their customers want finished goods available in less time than it takes to produce them. In order to achieve this, they need to adopt a planning strategy, and this is found in Materials Requirement Planning (MRP).

The main objective of  MRP is to guarantee material availability. Thanks to the MRP the company is able to:

  • Make sure that material is available for production and delivery to customers
  • Mantain the lowest possible level of inventory
  • Plan manufacturing activities, delivery schedules and purchasing

MRP can be done at plant or area level. MRP area planning is useful if want to restrict the planning to certain storage locations, whereas with MRP at plant level the system considers stocks from the storage locations within the plant, excluding stocks already reserved.

Basically, the MRP process starts with the requirements given directly by customers and with those planned in advance via sales forecast by Demand Management. In order to cover these independent requirements, MRP runs and calculates procurement quantities and dates. If a material is produced in-house, the system also calculates the dependent requirements, that is, the quantity of components required to produce the finished product or the assembly, by exploding the Bill Of Materials (BOM). If a material shortage exists, planned orders are created at every BOM level to cover requirements. These planned orders,  will be converted into Production Orders or Purchase Requisitions (PurReq). Normally, PurReq will generate Purchase Orders (PO).

MRP Procedures

In Consumption Based Planning, SAP uses the past consumption data to calculate the future requirements. There are three procedures within MRP:

  • Re-order point planning
    • Procurement is triggered when the sum of plant stock and firmed receipts fall below the reorder point
    • The reorder point is calculated as the material demand during replenishment lead time
    • The Safety Stock (SS) takes care of both excess material consumption within the replenishment lead time and additional requirements that may occur due to supply delays.

      Where:
      z = service factor based on desired service level
      L = average lead time
      σD =standard deviation of demand
      D = average demand
      σL = standard deviation of lead time
    • We can use Manual Reorder Point or Automatic Reorder Point
      • Manual Reorder Point: The planner manually enters the reorder point and the safety stock in the individual material master record. It corresponds to the MRP type VB.
      • Automatic Reorder Point: The system calculates the reorder level and the safety stock level using past consumption data of the material to forecast future requirements. It corresponds to the MRP type VM.
  • Forecast based planning
    • It is also based on historical data -the past material consumption data- and future requirements are determined by the forecasting program
    • Here the forecast values are used in MRP as the forecast requirements
    • Based on the consumption pattern the system changes the forecast requirements for future
    • MRP type needs to be entered as VV
  • Time phased planning
    • In this MRP procedure, the date of the planned requirement should coincide with a known date, such as the date when the supplier delivers
    • Requires that the material forecasting be completed for the material
    • MRP type needs to be entered as R1

The Planning file and running MRP

The Planning file contains the details of the materials that are to be included for the MRP run. MRP is to be activated for the plant, an entry for the material is to be made in the planning file for the specific plant for the MRP to happen.

  • MD20: T-Code for creating planning file (MDAB in the background)
  • Activate MRP & setup planning: Navigation path IMG → Materials Management → Consumption-Based Planning → Planning → Activate Material Requirements Planning

These are the SAP transaction codes to run MRP:

  • MD01: MRP Single Plant
  • MD02: MRP Single-Item, Multi-Level
  • MD03: MRP Single-Item, Single-Level

But planning run type depends on the processing key in the MRP run screen:

There are three types of processing key:

  • NETCH (Net change planning in total horizon)
    In this run, the system considers those materials in the planning run from their last MRP run in the total horizon. It depends if there was any change in stock, PurReq’s, PO’s, etc.
  • NETPL (Net change planning in the planning horizon)
    In this run, the system considers those materials in the planning run which have undergone any change in the planning horizon defined. Therefore, the number of materials to be taken for MRP Run can be restricted by defining the planning horizon.
  • NEUPL (Regenerative planning)
    It plans all the materials for the MRP Run irrespective of the changes they have undergone. This plan takes a long time to obtain the final result.

In the next article (MRP part II), I will explain in detail the planning process, stock requirement list, lot sizing procedure and how to analize and manage MRP traffic lights.

All about BAdIs

Experienced SAP consultants use the word “BAdI” frequently. In this post, I am going to explain what it is and its most common uses.

The BAdIs (Business Ad-ins) are tools for object-oriented programming in ABAP, that are used in SAP to implement validations and extensions to the SAP standard code in versions from 4.6c. For instance, the code generated by SAP in standard transactions (to order,…) cannot be changed (except to implement a SAP patch) since you would lose the support that SAP offers to its product. But imagine that when we finish a purchase order (PO) with transaction ME21N, we need to save certain data in a custom table called ZPORDER. For this reason we have the expansions (BAdIs, user exits, field exits, …). After all, they are just pieces of custom code that SAP allows us to introduce in its standard code to perform certain operations.

Do not confuse BAdIs with BApIs. The BApIs are simply ABAP functions available from transaction BAPI and called from other systems that perform specific operations with the parameters passed to them and can create purchase orders, modify, create material documents, …

Differences between BAdI and USER EXIT

  • BAdIs can be used as many times as needed, while USER EXITS can be used once time only. For example, if you assign a USER EXIT to a project with CMOD transaction, then you cannot assign it to another project. On the other hand, several developers can implement the same BAdI independently.
  • BAdIs are much more flexibles to the developer’s needs. We can define the exit points and the programming logic we need. It has all the properties of an object-oriented programming.
How to find the BAdI we need
There are several methods to find the BAdI we need, but I am going to explain a method based on transaction code ST05 (Performance Analysis).
This analysis technique is based on the fact that all BAdIs are registered in SAP tables. Thus, each time a BAdI is called the system go through those tables. The tables of the BAdIs are the following: SXS_INTER, SXC_EXIT, SXC_CLASS and SXC_ATTR. SAP always accesses those tables through the views V_EXT_IMP and V_EXT_ACT. Those views (tr. SE11) will be the basis of our analysis.
EXAMPLE:
Suppose we want to know what BAdIs are called in transaction BT “Mantain Business Partners”.

STEPS:

1.- Firstly, we have to check that no other user (tr. SM04) or background jobs (tr. SM50) are using the same user as you.
2.- Secondly, we have to enter in transaction ST05 (Performance Analysis) and set the indicator “Buffer trace”, after that we can press the button “Activate Trace”.
3.- Now the system is in “record” mode. Go to transaction BT, press the button “Organization” and fill in the fields with the following test data:
At the end, press the save button.
4.- Go back to the ST05 window and press the button “Deactivate trace” to finish the trace and press the button “Display Trace”. The popup “Set Restrictions for Displaying Trace” will appear.
5.- We have to filter the Trace by the objects: V_EXT_IMP and V_EXT_ACT. Which are our views.
Press the “Copy” button (F8), Fill Operations: OPEN and press “Enter”.
RESULT ANALYSIS:
We will obtain a Trace List like this:
All the “interface class names” of the view V_EXT_IMP start with IF_EX_. This is the standard SAP prefix for the “BAdI class interfaces”. The name of the BAdI starts after that IF_EX_. For instance, the name of the BAdI for IF_EX_ADDR_LANGU_TO_VERS is ADDR_LANGU_TO_VERS.
In transaction SE18 we can see the definition of the BAdI:
Advice: While the Trace execution, do not execute other transactions or commands in order to obtain the results as clean as possible.
However, we can see a list of the BAdIs availables following these steps:
– Go to transaction SE18
– Press F4 to open the matchcode
– Click on the “System information” icon
– Increase the maximum number of results to 999999
– Press the “OK” button

How to implement a BAdI
These are the two transactions we are going to work with BAdIs:
SE18 = BAdIs definition
SE19 = BAdIs implementation
Imagine that we have chosen the BAdI ME_PROCESS_PO_CUST and its method CLOSE which covers specific needs in the creation and modification of purchase orders, transactions ME21N and ME2N.
Therefore:
1.- Obtaining relevant information of the BAdI
  • Go to transaction SE18 with the BAdI ME_PROCESS_PO_CUST
  • Click on “Visualize”
  • Click on “Interface”
  • Double-click on “CLOSE”
  • Click on “Parameters” and go to IM_HEADER
In reference type we can see that its type is IF_PURCHASE_ORDER_MM
2.- Finding the available methods for each parameter
Suppose that we have chosen the BAdI ME_PROCESS_PO_CUST and the Interface POST
  • Go to transaction SE18 with the BAdI ME_PROCESS_PO_CUST
  • Click on “Visualize”
  • Click on “Interface”
  • Double-click on “POST”
We can see its parameters. Each of them has a reference type. The first of them is a simple type of data EBELN, the second IM_HEADER has the reference type IF_PURCHASE_ORDER_MM. With double-click on IM_HEADER the available methods will appear:
CREATE_ITEM
GET_DATA
GET_PREVIOUS_DATA
ETC.
With double-click on each method, we can see more details. For example:
  • Double-click on GET_DATA
  • Click on parameters
  • The parameter RE_DATA appears. It is a MEPOHEADER-type parameter.
  • Double-click on MEPOHEADER and we will see that is a header data stucture
It is important to know that at the beginin the implementation is not defined. The first time we enter in transaction SE19, we have to create the implementation with the same name that already has in SE18.
3.- Creating the implementation of the chosen BAdI
  • Go to transaction SE19
  • Click on “Create”
  • Enter the implementation name, for example ME_PROCESS_PO_CUST
  • Enter the definition name. It must be ME_PROCESS_PO_CUST
  • Select the AM2P package
  • Enter the transport order
  • Press the save button
  • Enter the SAP standard object modification password
  • Enter a short definiton. Usually the name of the transport order
  • Press the save button
  • Click on “Activate” and select all in order to recompile completely
4.- Modifying the source code of the implementation
  • Go to SE19 with the BAdI ME_PROCESS_PO_CUST
  • Click on Modify
  • Click on Interface
  • Double-click on CLOSE
  • Enter the password
  • Edit the text of the source code
Important: Do not forget the formal activation
– Go to SE19
– Click on Implementation
– Click on Activate

List of important SAP Tables

Important SAP tables list according to functional areas. In this link you can download an application which shows the relation between various SAP tables. Very useful!

Materials

MARA – Material Master: General data
MAKT – Material Master: Description
MARM – Material Master: Unit of Measure
MAPE  – Material master: Export control file
MARC – Material master: Plant data
MARD – Material master: Storage location
MAST – Material link to BOM
MBEW – Material valuation
MLGN – Material Master: WM Inventory
MLGT – Material Master: WM Inventory type
MDIP – Material: MRP profiles (field contents)
MKOP – Consignment price segment (old versions of SAP)
EBEW – Valuation of sales order stock
QBEW – Valuation of project stock
MVER – Material Master: Consumption <Plant>
DVER – Material Master: Consumption <MRP Area>
MVKE – Material Master: Sales <Sales Org, Distr Ch>
MLAN – Material Master: Tax indicator
MARC – Material Master: Plant data
MAPR – Material Master: Forecast
MARD – Material Master: Storage Location
MCH1 – Material Master: X Plant Batches
MCHA – Material Master: Batches
MCHB – Material Master: Batch Stock
MDMA – MRP Area data
DBVM – MRP Planning File Entry: MRP Area
MOFF – Outstanding Material Master Records (Maintenance status)

MARCH – Material Master C Segment: History
MARDH – Material Master Storage Location Segment: History
MBEWH – Material Valuation: History
MCHBH – Batch Stocks: History
MKOLH – Special Stocks from Vendor: History
MSCAH – Sales Order Stock at Vendor: History
MSKAH – Sales Order Stock: History
MSKUH – Special Stocks at Customer: History
MSLBH – Special Stocks at Vendor: History
MSPRH – Project Stock: History
MSSAH – Total Sales Order Stocks: History
MSSQH – Total Project Stocks: History

Vendors

LFA1 – Vendor Master: General data
LFB1 – Vendor Master: Company data
LFM1 – Vendor Master: Purchasing Data (Purchasing organization)
LFM2 – Vendor Master: Purchasing Data (Plant, Vendor sub-range)
WYT3 – Vendor Partner Functions

External Service Management

ASMD – Service Master: Basic Data
ASMDT – Service Short Texts

ESKL – Account assignment specification for service line
ESKN – Account assignment in service package
ESLH – Service package header data
ESLL – Lines in service package
ESSR – Service entry sheet header data
ESUC – External services management: Unplanned limits for contract item
ESUH – External services management: unplanned service limits header data
ESUP – External services management: unplanned limits for service packages
ESUS – External services management: Unplanned limits for service types

Purchasing

EBAN – Purchase requisition: items
EBKN – Purchase Requisition: account assignment
STXH – SAPScript Text Header
STXL – SAPScript Text Lines

EKKO – Purchasing document header
EKPO – Purchasing Document: Item
EKET – Purchasing Document: Delivery Schedules
MDBS – Material View of Order Item/Schedule Line (good to find open PO’s)
EKKN – Account assignment in purchasing document
EORD – Purchasing Source List
EIPA – Order price history record
EKAB – Release documentation
EKBE – Purchasing document history
EKBZ – Purchasing document history: delivery costs
EKPB – “Material to be provided” item in purchasing document

EINA – Purchase Info Record: General
EINE – Purchasing info record: purchasing organization data
KONP – Condition Item
KONH – Condition Header

Inventory Management

ISEG – Physical inventory document items

MKPF – Material document: Header
MSEG – Material document: item

RKPF – Reservation: Header
RESB – Reservation: Item

Invoice Verification

BSIM – Secondary index: documents for material
MYMFT – FIFO results table
MYML – LIFO material layer
MYMLM – LIFO material layer (monthly)
MYMP – LIFO period stocks, single material
MYMP1 – Receipt data LIFO/FIFO valuation
MYPL – LIFO pool layer
MYPLM – LIFO pool layer (monthly)
RBCO – Document item, incoming invoice account assignment
RBDIFFKO – Invoice Verification: conditions
RBDIFFME – Invoice Verification: quantity differences
RBDRSEG – Invoice Verification batch: invoice document items
RBKP – Document header: incoming invoice
RBKPB – Invoice document header (batch invoice verification)
RBTX – Taxes:incoming invoice
RBVD – Invoice document: summarization data
RBVDMAT – Invoice Verification: summarization data, material
RBWT – Withholding tax:incoming invoice
RKWA – Consignment withdrawals
RSEG – Document item, incoming invoice

Sales and Distribution

KONV – Conditions for Transaction Data
KONP – Conditions for Items
LIKP – Delivery Header Data
LIPS – Delivery: Item data
VBAK – Sales Document: Header Data
VBAP – Sales Document: Item Data
VBBE – Sales Requirements: Individual Records
VBEH – Schedule line history
VBEP – Sales Document: Schedule Line Data
VBFA – Sales Document Flow
VBLB – Sales document: Release order data
VBLK – SD Document: Delivery Note Header
VBPA – Sales Document: Partner
VBRK – Billing: Header Data
VBRP – Billing: Item Data
VBUK – Sales Document: Header Status and Administrative Data
VBUP – Sales Document: Item Status
VEKP – Handling Unit – Header Table
VEPO – Packing: Handling Unit Item (Contents)
VEPVG – Delivery Due Index

Customising and other master data

MDLV – MRP Areas
MDLG – MRP Areas – Storage Locations
MDLW – MRP Areas – Plants
MDLL – MRP Areas – Subcontractor
T023 – Material Groups
T024 – Purchasing groups
T030 – Standard Accounts Table (Automatic Account Determination)
T156 – Movement Type
T156T – Movement Type: Text

T16FS – Release Strategies
T16FT – Descriptions of Release Strategies
T16FV – Release Prerequisites
T16FD – Description of Release Codes
T16FK – Release Statuses
T16FC – Release Codes
AUSP – Release Procedure: Strategy values (cl20n, cl24n)
AGR_USERS – Assignment of roles to users
CDHDR & CDPOS – Change history of master data and documents
EDID4 – EDI information
TSTC – SAP Transaction Codes, lock/unlock: sm01, created: se93
TSTCT – Transaction codes TEXT

NAST – Message status


Materials Management (MM) Organizational Structure

As market leader in enterprise application software, SAP helps companies of all sizes and industries run better. Founded in 1972, SAP (which stands for “Systems, Applications and Products in Data Processing”) has a rich history of innovation and growth as a true industry leader. From back office to boardroom, warehouse to storefront, desktop to mobile device, SAP empowers people and organisations to work together more efficiently and use business insight more effectively to stay ahead of the competition, by extending the availability of software across on-premise installations, on-demand deployments and mobile devices.

The Material Management module (MM) is a core component of the SAP software. The functionality within MM is the engine that drives the Supply Chain. In this post, I am going to introduce the Materials Management Organizational Structure.

  • Client: Within one SAP instance, a number of clients could be created. The master data cannot be accessed from outside the client. In SAP we have objects that are used by all the clients in a SAP system called client independent and objects that are used by only one client called client dependent. SAP delivers the software with three clients: 000, 001 and 066. During the implementation, normally we will have one client for development and testing, one client for training and another client for production. Some facts about the client:
    1. Highest hierarchical level in SAP
    2. All areas of an organization that are to be integrated into the SAP R/3 production system should be included under one client
    3. There is a common set of rules in one client
      • Common tables
      • Common master files
      • Common databases
    4. Standardized Data Across the client
      • A vendor number and name is common across the client
      • A customer is common across the client
      • A general ledger number and description is common across the client
      • A material number and description is common across the client
  • Company Code: SAP defines a company and a company code separately. A company can contain one or more company codes, but they must use the same chart of accounts and the same fiscal-year breakdown. The company code will represent legally independent companies. The company field is defined in transaction OX15 and the company code is created in transaction OX02. To maintain the company code address you need to use transaction OBY6. Some facts about the company code:
    1. Balance sheet, profit loss statements require by law are created at company code level.
    2. To create a company code we can easily copy the standard one and then customized it.
  • Plants: A plant it is a location that holds valuated stock or contains service or maintenance facilities. A four-character string defines the plant field -tr. OX10-. Tip: When creating a plant just copy the standard plant which automatically make the entry in the plant table and all others depended tables. The valuation level it is an important configuration step because it specifies the level at which material stock are valuated for the whole client -tr. OX14-. There are two options: plant level or company code level. Once a valuation is determined, it should not be changed. Once a valuation level has been stablished, it is possible to assign a plant to an existing company code -tr. OX18-.
  • Storage Locations: It is a place where stock is physically kept within a plant. There will be always at least one storage location defined for one plant -tr. OX09-. It is the lowest level of location definition and organizational structure within the MM module, but it is not the lowest level in the SAP system, since the Warehouse Management (WM) module provides the opportunity to manage inventory at a bin level (Warehouse → Storage Type → Storage Sections → Storage Bins). It is possible to create storage locations automatically (for each plant where this is needed) when an inward goods movement for a material is performed, but only for normal stock, not special stock -tr. OMB3-.